How to drive your laptop to make everything work
 The saying that ‘Time will cure every wounds’ is a statement that doesn’t really apply to the notion of computing. In fact, time is normally the major cause of hardware slowdown on laptops; as usage increases on the higher side and more things get installed, workload is placed on a laptop’s small memory and other hardware sizes.
Do you know that slow laptops are the bone of contention of many enterprises, we’re all well used with the disappointment of opening a program and waiting for so long for it to come up- it can be so annoying, just pack it one side and place an order for a new device, but there are steps you can adopt to drive the device to work more efficiently.
The saying that ‘Time will cure every wounds’ is a statement that doesn’t really apply to the notion of computing. In fact, time is normally the major cause of hardware slowdown on laptops; as usage increases on the higher side and more things get installed, workload is placed on a laptop’s small memory and other hardware sizes.
Do you know that slow laptops are the bone of contention of many enterprises, we’re all well used with the disappointment of opening a program and waiting for so long for it to come up- it can be so annoying, just pack it one side and place an order for a new device, but there are steps you can adopt to drive the device to work more efficiently.
 The truth is that even with frequent upkeep, the chances that your laptop will ever perform as it did when it was bough new is very slim. But making of these steps will no doubt keep you from smashing it in annoyance, even it’s just for a for a period of time.
1 Delete unused programs
 Sometimes I wonder why some users still keep irrelevant and unused programs, thereby creating congestion on their laptop. It’s pretty good to uninstall all the programs you don’t want to use as it will give the system high speed. Microsoft reveal that it’s essential to uninstall any utility programs you might have installed over a long period of usage, such as virus scanners, disk cleaners, and backup tools, as they normally appear after booting, softly hidding along in the background where it is difficult to see them. Some of us did not understand that they’re still running.
Don’t say is too late, you can try to get rid of those irrelevant programs that you thought you might be causing nuisance. It is good to uninstall it and your lap should run faster and work properly.
Sometimes I wonder why some users still keep irrelevant and unused programs, thereby creating congestion on their laptop. It’s pretty good to uninstall all the programs you don’t want to use as it will give the system high speed. Microsoft reveal that it’s essential to uninstall any utility programs you might have installed over a long period of usage, such as virus scanners, disk cleaners, and backup tools, as they normally appear after booting, softly hidding along in the background where it is difficult to see them. Some of us did not understand that they’re still running.
Don’t say is too late, you can try to get rid of those irrelevant programs that you thought you might be causing nuisance. It is good to uninstall it and your lap should run faster and work properly.
2 – Limit startup programs
 Do you know that some programs are package to begin automatically when Windows is on. The truth is that software dealers often set their programs to run in the background, where you can’t see them, so they’ll come up right away when you click their tags. That’s good for programs you use frequently , but for programs you hardly use, this consume precious memory and weigh down the time it takes Windows to finish booting.
Meanwhile , you can decide for yourself if you need a program to run at the beginning.
However, to check how to see what programs run automatically at the beginning , make use of AutoRuns for Windows. The tool is free, that you can download from the Microsoft online , and clearly open your eyes to all of the programs and procedures that run when you commence your OS. You can put an end to a program from running automatically when Windows is on by making sure that the AutoRuns is open, and then by wiping the checkbox that follows the name of the program you desire to end. Note that AutoRuns for Windows is package for advanced users and is really good.
Do you know that some programs are package to begin automatically when Windows is on. The truth is that software dealers often set their programs to run in the background, where you can’t see them, so they’ll come up right away when you click their tags. That’s good for programs you use frequently , but for programs you hardly use, this consume precious memory and weigh down the time it takes Windows to finish booting.
Meanwhile , you can decide for yourself if you need a program to run at the beginning.
However, to check how to see what programs run automatically at the beginning , make use of AutoRuns for Windows. The tool is free, that you can download from the Microsoft online , and clearly open your eyes to all of the programs and procedures that run when you commence your OS. You can put an end to a program from running automatically when Windows is on by making sure that the AutoRuns is open, and then by wiping the checkbox that follows the name of the program you desire to end. Note that AutoRuns for Windows is package for advanced users and is really good.
3 Get rid of ‘bloatware’
 Do you know that it’s not just old devices that can suffer from latency. Latest laptops can also get affected and that’s down to the bloatware dealers preinstall on their devices. Regardless of how you refer to it as bloatware or something else, this irrelevant software indeed can slow down the operations of laptop.
You may not even want all these extras that follows your laptop. If yu have allow them to stay on your device since you purchase it, you’ll no doubt need a crosscheck of what you use and really want and what you don’t need.
It is clear that programs like PCDecrapifier can make the step of deleting bloatware really stress free and is an easy win for those aspiring to speed up their device.
Do you know that it’s not just old devices that can suffer from latency. Latest laptops can also get affected and that’s down to the bloatware dealers preinstall on their devices. Regardless of how you refer to it as bloatware or something else, this irrelevant software indeed can slow down the operations of laptop.
You may not even want all these extras that follows your laptop. If yu have allow them to stay on your device since you purchase it, you’ll no doubt need a crosscheck of what you use and really want and what you don’t need.
It is clear that programs like PCDecrapifier can make the step of deleting bloatware really stress free and is an easy win for those aspiring to speed up their device.
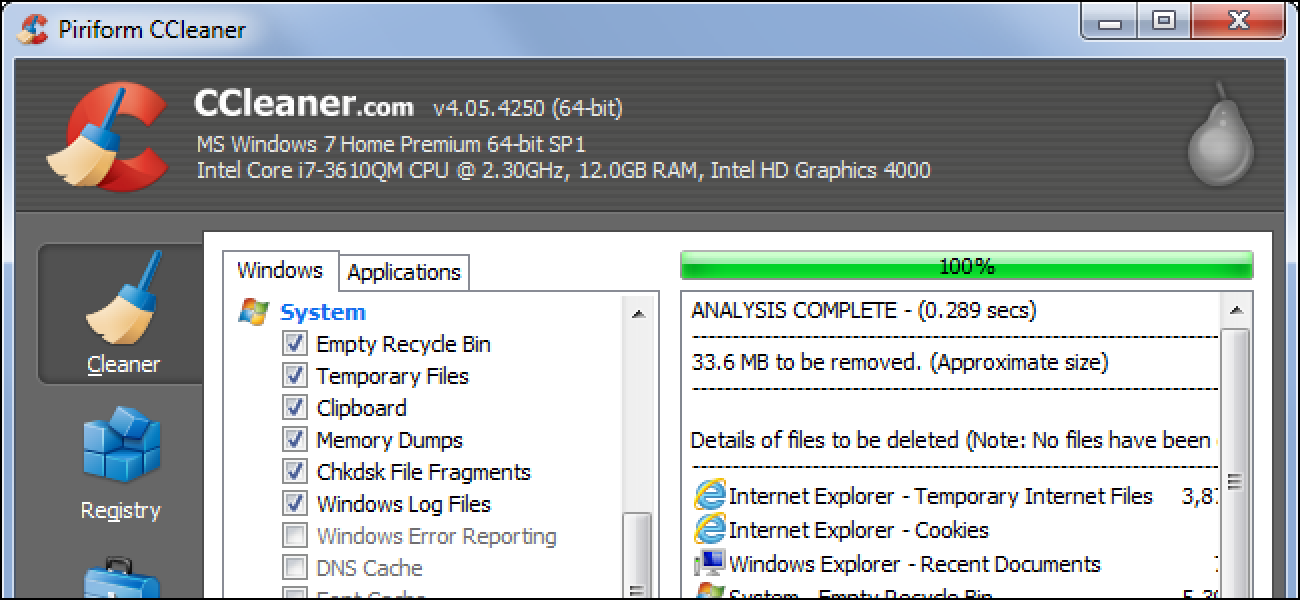
4 Make use of CCleaner
 Anither major thing you should perform if your device is slow as it used to is to run a file scanner to discover whether there are any outdated documents or folders you don’t want again or haven’t used for a period of time . Any of this additional data, such as caches, temporary files and cookies can allow your device to perform slowly.
Research shows that one of the reliable tools that will clean up your device for you is CCleaner. It’ll penetrate your computer’s hard drive, looking for any documents that haven’t been used for a period of time, wiping them if you give go ahead . It will also search for any issues that may be slowing down the operations of your laptop and a tab will give you the chance to delete programs right from the app, off startup programs and recognize huge document on your device that are consuming disk space.
On the first note, try and download and install CCleaner. After installation, open the apps. This will run on the cleaner tab. Tap on Run Cleaner and this will run through the drive searching for files like temporary internet document and clean the data. You can select what files you want to check for, such as required apps or system parts.
On a second, tap on the Registry tab to wipe off irrelevant entries that could allow your laptop to be performing slowly.
On a third note, make use of the Tools tab to delete various programs and apps already installed on your device.
Anither major thing you should perform if your device is slow as it used to is to run a file scanner to discover whether there are any outdated documents or folders you don’t want again or haven’t used for a period of time . Any of this additional data, such as caches, temporary files and cookies can allow your device to perform slowly.
Research shows that one of the reliable tools that will clean up your device for you is CCleaner. It’ll penetrate your computer’s hard drive, looking for any documents that haven’t been used for a period of time, wiping them if you give go ahead . It will also search for any issues that may be slowing down the operations of your laptop and a tab will give you the chance to delete programs right from the app, off startup programs and recognize huge document on your device that are consuming disk space.
On the first note, try and download and install CCleaner. After installation, open the apps. This will run on the cleaner tab. Tap on Run Cleaner and this will run through the drive searching for files like temporary internet document and clean the data. You can select what files you want to check for, such as required apps or system parts.
On a second, tap on the Registry tab to wipe off irrelevant entries that could allow your laptop to be performing slowly.
On a third note, make use of the Tools tab to delete various programs and apps already installed on your device.
5 Get defragging
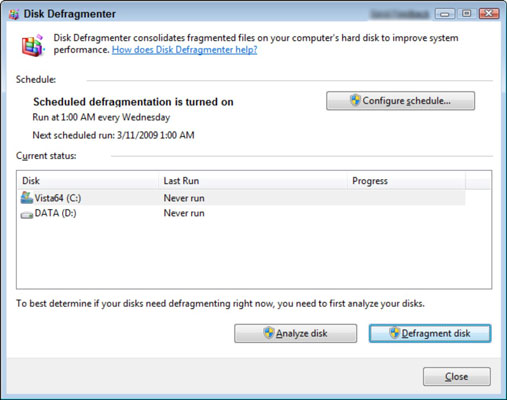 The truth is that outdated mechanical hard drives suffer alot from defragmentation. Meaning that document are often spread across a drive and this slows the device down as it strive to access all parts of the document.
Note that defragging will package the document back together again and later increase speeds of hard drive access.
Meanwhile, to defrag your hard drive, check the control panel, choose ‘System and Security’ under Admin Tags.
You can expansiate the drive to check how fragmented it is. The next thing is to tap on the drive you want to defrag. It will later run the process, boosting the drive.
The truth is that outdated mechanical hard drives suffer alot from defragmentation. Meaning that document are often spread across a drive and this slows the device down as it strive to access all parts of the document.
Note that defragging will package the document back together again and later increase speeds of hard drive access.
Meanwhile, to defrag your hard drive, check the control panel, choose ‘System and Security’ under Admin Tags.
You can expansiate the drive to check how fragmented it is. The next thing is to tap on the drive you want to defrag. It will later run the process, boosting the drive.
6 ReadyBoost
 In case you want to know, ReadyBoost is a program of Windows that was featured in Windows Vista. It automatically uses a flash drive as a bit of additional memory.
Although not as perfect as swapping a traditional hard drive for a strong state one or in addition to more RAM, ReadyBoost will add a small uptick to the performance of your device. It sets aside a segment of the flash drive memory and boost random read access speed perfectly.
In order to make use of ReadyBoost, try and attach a USB memory drive into an open slot on the device you intend to speed up. A dialogue box will come up asking you what you want to carry out with the flash drive. Select Speed up my system via Windows ReadyBoost.
Meanwhile, another window will open, where you can choose how much of the drive you want to utilize on the flash pen. It is obvious an awesome idea to utilize as much of the drive as you want.
Immediately you have achieve this, reaffirm the settings and the window will close. The drive will immediately be shown and used.
In case you want to know, ReadyBoost is a program of Windows that was featured in Windows Vista. It automatically uses a flash drive as a bit of additional memory.
Although not as perfect as swapping a traditional hard drive for a strong state one or in addition to more RAM, ReadyBoost will add a small uptick to the performance of your device. It sets aside a segment of the flash drive memory and boost random read access speed perfectly.
In order to make use of ReadyBoost, try and attach a USB memory drive into an open slot on the device you intend to speed up. A dialogue box will come up asking you what you want to carry out with the flash drive. Select Speed up my system via Windows ReadyBoost.
Meanwhile, another window will open, where you can choose how much of the drive you want to utilize on the flash pen. It is obvious an awesome idea to utilize as much of the drive as you want.
Immediately you have achieve this, reaffirm the settings and the window will close. The drive will immediately be shown and used.
7 Turn off unnecessary animations
 Do you realize that ever since Windows Vista and some will say Windows XP, the operating system has had unique graphics and animated display that perform little to enhance productivity. If these are weighing things down, it is easy to turn off the whole process and perform on the bare essentials. There is no room for irrelevant task or operations.
To perform this, click on that Start Menu and begin typing in ‘try and adjust the display and workings of Windows’. Tap on this icon and from the display menu untick everything you don’t want on the device again. Tap on OK and this will change the display to something more unique.
Do you realize that ever since Windows Vista and some will say Windows XP, the operating system has had unique graphics and animated display that perform little to enhance productivity. If these are weighing things down, it is easy to turn off the whole process and perform on the bare essentials. There is no room for irrelevant task or operations.
To perform this, click on that Start Menu and begin typing in ‘try and adjust the display and workings of Windows’. Tap on this icon and from the display menu untick everything you don’t want on the device again. Tap on OK and this will change the display to something more unique.